my creative pursuits with quilts and knits

Posts tagged ‘free motion quilting’

Free Motion Quilting

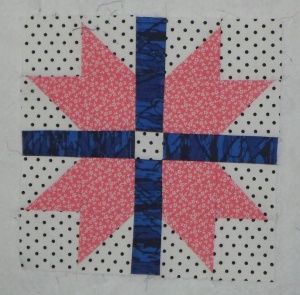
My best customer is keeping me in business 😉  Thanks Mom!  She is a certified Angle Play (TM) instructor, and this is a class sample.

image (not wrinkled in real life, just laid on a chair for a quick photo)

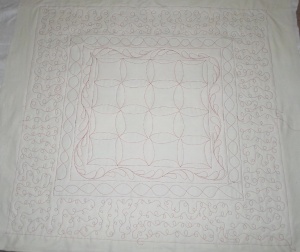
I matched the thread to the rows and did a free motion swirl design across the blue sections and a fern feather across the yellow parts.  Here is the back detail.

image

I think of the blue section as Landscape fill, since it can look like elevation lines on a contour map.  Here is a sketch of how it is quilted.  You can also search through Leah Day’s tutorials for a similar design.

image

First break your space into smaller sections, then go back and echo the line.  I use alot of gentle S curves.image You can add a swirl here and there for more interest.  I also add a touch of McTavishing, which is a slightly different effect where one end of the curve always hits the same point.  This is a good filler design for borders.

I want to mention that if you ever see a quilt you are interested in purchasing, please contact me.  I am open to selling my work and I do quilt on commission.  I can teach workshops too!

Start and Finish

imageSome random thoughts on a Saturday…do you keep wound bobbins on hand?  I usually wind 3-4 at a time.  When they are all empty, I clean the lint from the bobbin case and wind them all up again!  I was on the ball today and noticed that my bobbin was almost out at the end of a block, rather than halfway down a long seam.  I use either beige or grey for all my piecing then do the quilting on my Gammill longarm.

Which brings me to the finishing topic! I was working on the border of a customer quilt, and thought I’d share my favorite sashing/border design.  Free hand feathers are faster to stitch than you might think, and a one-sided feather is easy to put in almost any size space.

Start with a curved stem and a teardrop for the first loop of the feather.  You will alternate groups of three loops on either side of your curvy stem.image

Tuck the next two loops under the first teardrop.  I try to make each one a bit smaller than the previous loop.image  For the next group, echo along the stem and curve in the other direction.  Start with the big teardrop and add two smaller loops.image

Continue echoing along the stem and adding groups of three loops to each side.imageOf course, the number three is arbitrary…you can use four or five or any amount of loops depending on how large you make your curves and/or loops.

This sample is drawn on a white board, with dry erase marker, which is a good way to practice free motion quilting designs.  Any time you spend doodling will build that muscle memory, making it easier to stitch a design when you sit down at the machine.

What are your favorite quilting designs?

Feathered Hearts

Here is a pictorial of how to stitch a feathered heart.  I have taken several longarm quilting classes from people like Dawn Cavanaugh, Deloa Jones and Angela Waters.  They are very helpful in learning to quilt feathers!  I also recommend a sketchbook and/or a whiteboard so you can doodle and build your muscle memory for this design.


Start with your foundation or spine…in this case it is a heart.  Then make a “bubble” on the inside peak.  (I am showing the steps on a whiteboard, you can see it stitched at the end.)  You will stitch four sections: inside right, outside right, inside left and outside left.

image

Then start the feathers along the inside.  It really doesn’t matter which side you start with!  Remember you are making question marks, or half-heart shapes.  Do not come into the spine at a 90 degree angle, think about merging onto a freeway…you come in almost parallel.  You are stitching from the top to the bottom.image

Before you start back up the outside, make an extra bubble or two at the bottom.  This fills the space without leaving a gap from the end of the last feather loop.  Stitch from the bottom to the top with the same question mark/half-heart shape.image

You will have more loops on the outside!  it can be tricky to come around the curve at the top, just keep making the loops, and think about extending them up as you curve around the top of the heart.  Think of an imaginary line through the center of the heart so you can stop without crowding the other side.image

Travel along the spine to the inside of the heart to stitch the other side, moving from the top to the bottom.image

Use another extra bubble at the bottom as you stitch back up the outside.  Your last loop at the top will just meet the previous feather and give it a kiss!image And here is the fabric and thread version: imageIt takes practice to master feathers.  Doodle first, then grab some fabric for practice on the machine.  When you feel comfortable with the design, transfer the process to a quilt.  Each one will look better than the last!

Happy Stitching!

Holiday Sewing!

Phew…I am glad we all survived the fall semester.  Hubby is working two jobs,  I work and volunteer, and daughter skates.  We have busy lives, and I am thankful for our many blessings.

But, it is nice to have some time off to play in my sewing room! Here is the quilting for a Christmas project, some basic freehand designs on the longarm.pillow quilting

And I am cutting patches for a Star Crossed Block. You can find the pattern at Block Lotto, it is the December block.dec12 lotto 3

I am getting ready for the Quilts of Valor 1st Annual New Year’s Day Sit-n-Sew (NYDSnS)!  Everyone involved in QOV is planning to work on a quilt top on January 1.  Hopefully, we can get lots of tops done, and then the longarmers (me included) will get busy with the next step.  The goal is to have these New Year’s quilts ready to mail by March 13th.  I think there are prizes…check the QOVF blog!qov prep

You may be wondering about the paper plates…I am making an attempt to be organized!  The block consists of star, background and cross fabrics, perfect for a scrappy patriotic quilt.  I cut the necessary pieces from a blue fabric, then separate them onto three plates.  Then I grab a white fabric and a red fabric – cut, distribute, and then I have all the blocks ready to assemble.  Each plate is a complete block, and the fabrics are jumbled so they should make unique combinations.  I am noticing a distinct lack of white in my stash, so I will shop in Grandma’s sewing room on Christmas day and make a run to the LQS if needed.

For my QOV top, I have calculated that you need 2 strips of each fabric (1 strip at 3″, 1 strip at 2.5″), and 14 different reds, whites and blues will give you 42 9″ blocks.  I plan to add 1.5″ sashing and 3″ borders from a yard and a half of yellow/gold fabric.

Feel free to email me if you want more details about this pattern.  Judy L. at Patchwork Times has a pattern from 2.5″ strips, and some people have found free patterns online with the keywords “5 yard quilt.”